Saturday, August 23, 2014

Making GalleryView items clickable with FancyBox

I am currently making use of the GalleryView jQuery plugin which feels great but it lacks a functionality that I needed: clicking on the images to show them in a modal dialog.

I therefore integrated a separate plugin called FancyBox that handles modal functionality beautifully.

To do this, I first did a minor change to jquery.galleryview.js, where I added the following underneath var img = $('<img />');:
img.attr('class', 'clickable');
img.attr('alt', gvImage.attrs.title);

This is so that I can access the images in the GalleryView image gallery whenever an image is clicked, and I reference them with a class clickable. I also fetch the description of the image and store it in the alt tag.

Then I simply hook to those images and open fancy box with the current image that's displayed on the slideshow:
$('.clickable').live('click', function(e){ 
    var img = $(this);
    var imgSrc = img.attr('src');
    var imgDesc = img.attr('alt');
    
    $.fancybox.open([ { href : imgSrc, title : imgDesc } ], { padding : 0 });
});

And here's a demo.

Monday, July 21, 2014

A workaround for allowing multiple callbacks to Application.RegisterLogCallback

Unity only supports a single delegate to be registered with Application.RegisterLogCallback, which is unfortunate because it means that two independent plugins can't make separate use of it.

A bug was filed for this issue last year: http://feedback.unity3d.com/suggestions/change-application-dot-registerlogcallback-to-allow-multiple-callbacks

To get around this, I wrote a class to allow for multiple callbacks to be registered. Make sure let only this class make the call to Application.RegisterLogCallback.
using System.Collections.Generic;
using UnityEngine;

/// <summary>
/// Unity only handles a single delegate registered with Application.RegisterLogCallback
/// http://feedback.unity3d.com/suggestions/change-application-dot-registerlogcallback-to-allow-multiple-callbacks
/// 
/// This class is used to work around that by allowing multiple delegates to hook to the log callback.
/// </summary>
public static class LogCallbackHandler
{
    private static readonly List<Application.LogCallback> callbacks;

    static LogCallbackHandler()
    {
        callbacks = new List<Application.LogCallback>();

        Application.RegisterLogCallback(HandleLog);
    }

    /// <summary>
    /// Register a delegate to be called on log messages.
    /// </summary>
    /// <param name="logCallback"></param>
    public static void RegisterLogCallback(Application.LogCallback logCallback)
    {
        callbacks.Add(logCallback);
    }

    private static void HandleLog(string condition, string stackTrace, LogType type)
    {
        for (var i = 0; i < callbacks.Count; i++)
        {
            callbacks[i](condition, stackTrace, type);
        }
    }
}

Thursday, June 26, 2014

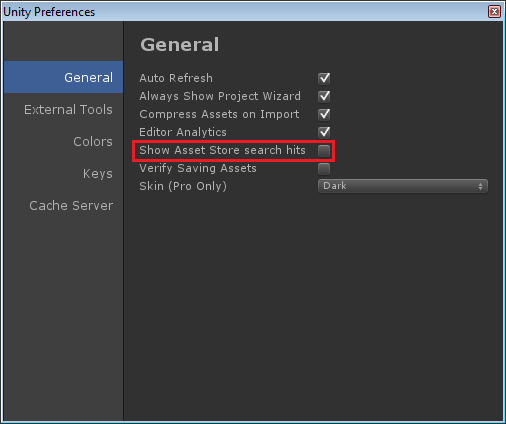
Getting rid of the pesky "Uncaught exception in async net callback" Unity message

After some Unity update a couple of months back, an annoying error started showing in the console unexpectedly:

Uncaught exception in async net callback: Object reference not set to an instance of an object
UnityEditor.AsyncHTTPClient:Done(State, Int32)

  at UnityEngine.GUISkin.GetStyle (System.String styleName) [0x00010] in C:\BuildAgent\work\aeedb04a1292f85a\artifacts\EditorGenerated\GUISkinBindings.cs:268 
  at UnityEngine.GUIStyle.op_Implicit (System.String str) [0x00020] in C:\BuildAgent\work\aeedb04a1292f85a\artifacts\EditorGenerated\GUIStyleBindings.cs:833 
  at UnityEditor.ProjectBrowser.InitSearchMenu () [0x00014] in C:\BuildAgent\work\aeedb04a1292f85a\Editor\Mono\ProjectBrowser.cs:460 
  at UnityEditor.ProjectBrowser.AssetStoreSearchEndedCallback () [0x00000] in C:\BuildAgent\work\aeedb04a1292f85a\Editor\Mono\ProjectBrowser.cs:488 
  at UnityEditor.ObjectListArea+c__AnonStorey10.<>m__19 (UnityEditor.AssetStoreSearchResults results) [0x00356] in C:\BuildAgent\work\aeedb04a1292f85a\Editor\Mono\ObjectListArea.cs:407 
  at UnityEditor.AssetStoreResultBase`1[Derived].Parse (UnityEditor.AssetStoreResponse response) [0x000fc] in C:\BuildAgent\work\aeedb04a1292f85a\Editor\Mono\AssetStore\AssetStoreClient.cs:89 
  at UnityEditor.AssetStoreClient+c__AnonStorey2E.<>m__53 (UnityEditor.AssetStoreResponse ar) [0x00000] in C:\BuildAgent\work\aeedb04a1292f85a\Editor\Mono\AssetStore\AssetStoreClient.cs:751 
  at UnityEditor.AssetStoreClient+c__AnonStorey2D.<>m__51 (UnityEditor.AsyncHTTPClient job) [0x00012] in C:\BuildAgent\work\aeedb04a1292f85a\Editor\Mono\AssetStore\AssetStoreClient.cs:624 
UnityEditor.AsyncHTTPClient:Done(State, Int32)

Long story short, this is how you get rid of it:

Thursday, February 13, 2014

Failed to start a Riak cluster after changing the -name parameter in vm.args

I am currently in the process of setting up a Riak cluster and I encountered a problem where my cluster would not start if I change the -name parameter in the vm.args file.

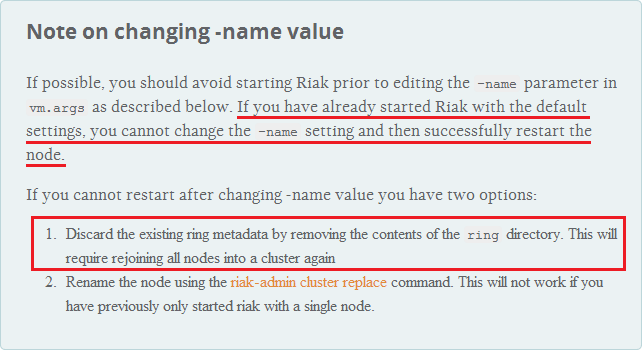
After some searching, I found this official link with this notice:


Following the first option to delete the contents of the ring directory (I built from the source, so my ring directory was at /riak-1.4.7/rel/riak/data/ring/), I then managed to successfully restart the cluster with ./riak start.

Wednesday, January 15, 2014

Changing Unity's default MonoBehaviour and Shader templates

If you find yourself having to delete those default // Use this for initialization and // Update is called once per frame comments every time you create a script file, then it's probably best you modify Unity's default source file template.

From Unity 4, assuming a default installation directory these templates are found in: C:\Program Files (x86)\Unity\Editor\Data\Resources\ScriptTemplates

In there, you'll find the JavaScript, C# and Boo script templates along with the shader and compute shader templates.

Here's the C# one:
using UnityEngine;
using System.Collections;

public class #SCRIPTNAME# : MonoBehaviour {

 // Use this for initialization
 void Start () {
 
 }
 
 // Update is called once per frame
 void Update () {
 
 }
}

Friday, December 20, 2013

Embedding sprites in a dfLabel with DFGUI

One of DFGUI's cool features is the ability to inline-embed images in a dfLabel to avoid having separate sprites layered on top of the dfLabel.


To embed sprites in a dfLabel, you must first make sure that the Process Markup checkbox (Label Properties->Formatting) is ticked.

Then, embedding sprites is done using the sprite tag: Press [sprite "xbox_a"] to Select

The sprite that is specified in the sprite tag (in my case it's "xbox_a") is fetched from the Atlas that is specified on the dfLabel.

Friday, December 13, 2013

A 2D Freeform Directional Blend Tree for locomotion in Unity 3D

This video demonstrates a root-motion driven, 2D Freeform Directional Blend Tree for locomotive states in Unity 3D.

Using such a blend tree, a character can aim and walk in different directions independently and simultaneously.


With a gamepad, I'm moving the character with the left stick and rotating with the right stick.

I am using a total of 9 animations for the blend tree. Four for each axis and the middle one for idle:
  1. Idle
  2. Forward Walk
  3. Backward Walk
  4. Left Strafe Walk
  5. Right Strafe Walk
  6. Forward Run
  7. Backward Run
  8. Left Strafe Run
  9. Right Strafe Run

Here's a closer look at the blend tree and its motions:


This locomotive blend tree exists on an Animator Layer called LowerBody which has has an Avatar Mask applied with only the legs selected (including IK). By having layers representing different sections of the body, I can combine upper-body animations with lower-body animations. In my case, the character can walk/run and aim at the same time using a single animation for AIMING (which exists on the upper-body layer).

This is the Avatar Mask I use on the Lower-Body layer on which the locomotion blend tree exists:


I am controlling the blend tree with two parameters representing a direction vector: VelX and VelZ.

This direction vector determines the locomotive state of the character i.e. which direction his legs should be moving.

  • If (VelX, VelZ) is (0, 1), the character runs forward in a straight line.
  • If (VelX, VelZ) is (-1, 0.5), the character walks forward while strafing to the left.
  • If (VelX, VelZ) is (0.5, -1), the character runs backwards while slightly strafing to the right
  • etc...

This is the gist of the code which both a) sets the (VelX, VelZ) direction vector [Left Stick] i.e. LOCOMOTION and b) rotates the model to aim [Right Stick] i.e ROTATION:

private Vector3 lastLeftStickInputAxis;  // stores the axis input from the left stick between frames

private void Update()
{
    /* START LOCOMOTION */

    // Get the axis from the left stick (a Vector2 with the left stick's direction)
    var leftStickInputAxis = inputManager.LeftAxis;
    
    // Get the angle between the the direction the model is facing and the input axis vector
    var a = SignedAngle(new Vector3(leftStickInputAxis.x, 0, leftStickInputAxis.y), model.transform.forward);
    
    // Normalize the angle
    if (a < 0)
    {
        a *= -1;
    }
    else
    {
        a = 360 - a;
    }
    
    // Take into consideration the angle of the camera
    a += Camera.main.transform.eulerAngles.y;

    var aRad = Mathf.Deg2Rad*a; // degrees to radians
    
    // If there is some form of input, calculate the new axis relative to the rotation of the model
    if (leftStickInputAxis.x != 0 || leftStickInputAxis.y != 0)
    {
        leftStickInputAxis = new Vector2(Mathf.Sin(aRad), Mathf.Cos(aRad));
    }
    
    float xVelocity = 0f, yVelocity = 0f;
    float smoothTime = 0.05f;

    // Interpolate between the input axis from the last frame and the new input axis we calculated
    leftStickInputAxis = new Vector2(Mathf.SmoothDamp(lastLeftStickInputAxis.x, leftStickInputAxis.x, ref xVelocity, smoothTime), Mathf.SmoothDamp(lastLeftStickInputAxis.y, leftStickInputAxis.y, ref yVelocity, smoothTime));
    
    // Update the Animator with our values so that the blend tree updates
    animator.SetFloat("VelX", leftStickInputAxis.x);
    animator.SetFloat("VelZ", leftStickInputAxis.y);
    
    lastLeftStickInputAxis = leftStickInputAxis;

    /* END LOCOMOTION */


    /* START ROTATION */

    // Get the axis from the right stick (a Vector2 with the right stick's direction)
    var rightStickInputAxis = inputManager.RightAxis; 
    if (rightStickInputAxis.x != 0 || rightStickInputAxis.y != 0)
    {
        float angle2 = 0;
        if (rightStickInputAxis.x != 0 || rightStickInputAxis.y != 0)
        {
            angle2 = Mathf.Atan2(rightStickInputAxis.x, rightStickInputAxis.y)*Mathf.Rad2Deg;
            if (angle2 < 0)
            {
                angle2 = 360 + angle2;
            }
        }
    
        // Calculate the new rotation for the model and apply it
        var rotationTo = Quaternion.Euler(0, angle2 + Camera.main.transform.eulerAngles.y, 0);
        model.transform.rotation = Quaternion.Slerp(model.transform.rotation, rotationTo, Time.deltaTime*10);
    }

    /* END ROTATION */
}

private float SignedAngle(Vector3 a, Vector3 b)
{
    return Vector3.Angle(a, b) * Mathf.Sign(Vector3.Cross(a, b).y);
}

The soldier model and animations are from Mixamo.